
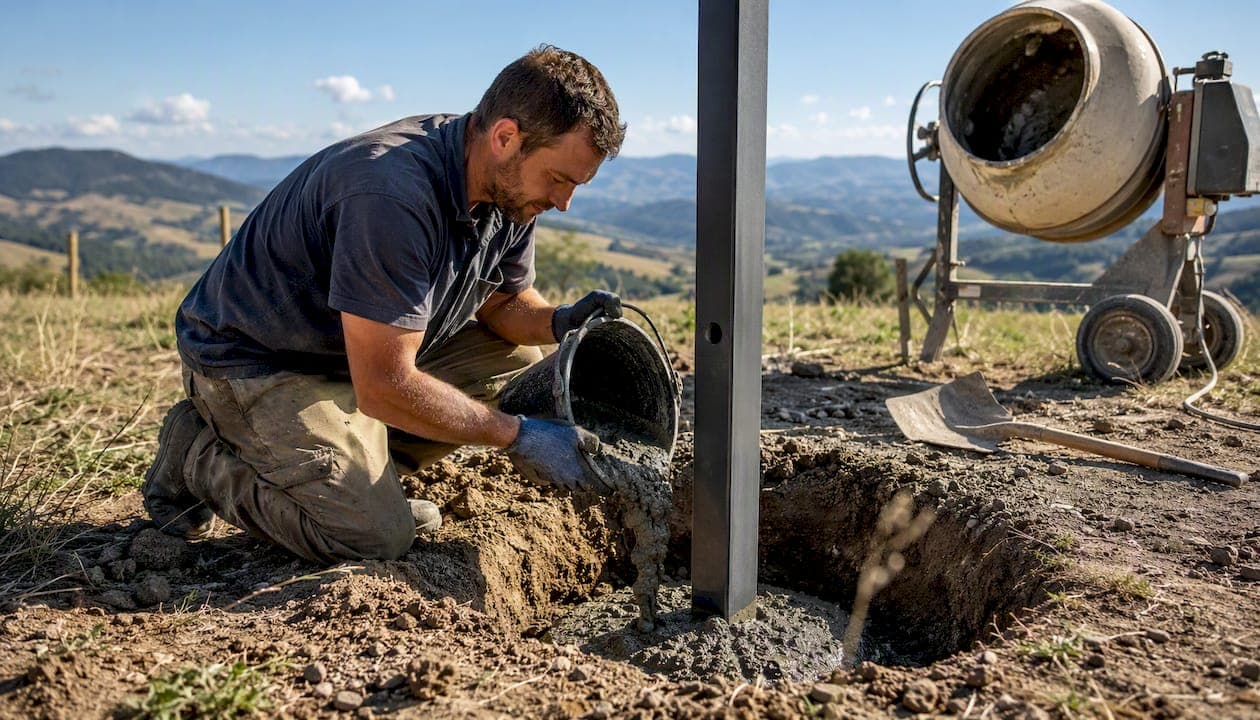
For exposed, high-site Starlink installations, a dedicated pole mount with a concrete footing or a heavy-duty pivot mount with a wind-rated bracket are the most reliable choices. If you already have a tower or steel mast on your property, a tower clamp with a horizontal arm beats both. RV or vehicle installs call for a purpose-built clamp or low-profile vehicle mount instead.
Whether to DIY or hire a professional comes down to three things: how high you're going, what the wind is like at your site, and whether the job involves structural roof penetrations. A ground-level pole mount in a sheltered yard is a reasonable DIY project. A roof-top pivot on a two-story home in a coastal or high-wind zone is a job for an accredited installer.
- Pole or tower mount: best for open rural sites, paddocks, and remote properties where sky clearance is the priority
- Pivot or flashing mount: best for sloped roofs on homes where the dish needs elevation above the roofline
- Ridgeline ballast mount: best when you want zero roof penetrations on a gable-end roof (not suitable for clay tile)
- RV or vehicle clamp: best for mobile installs on caravans, camper trailers, or work vehicles
Pro Tip: Before buying any hardware, run the Starlink obstruction check in the app from the exact spot you plan to mount. A location that looks clear from the ground often has a tree or roofline eating into the required sky cone once you check it properly.
Key Takeaways
A pole mount with a properly poured concrete footing remains the most reliable choice for exposed, high-site Starlink installations where sky clearance and wind resistance are the deciding factors.
| Point | Details |
|---|---|
| Best mount by scenario | Pole or tower clamp for rural/remote; pivot/flashing for sloped roofs; ridgeline ballast for no-drill gable installs |
| Footing and vertical tolerance | Minimum 0.6 m deep concrete footing; pole must be vertical within 5 degrees to avoid dish alignment errors |
| Corrosion protection | Use hot-dip galvanized poles and 316 stainless fasteners, especially in coastal or high-humidity sites |
| When to hire a pro | Any install above 2 m, involving roof penetrations, or in a high-wind zone warrants a licensed, insured installer |
| Djcengineering | Provides scoped, accredited high-site Starlink installs across South East Queensland with a high first-visit fix rate |
Table of Contents
- Which Starlink high-site mount type suits your situation?
- Installation requirements, wind ratings, and weatherproofing
- Starlink model compatibility and adapter sizing
- Tools, materials, and realistic costs
- How to decide: DIY vs. hiring a professional installer
- What a professional high-site Starlink install actually looks like
- What pros fix most often on high-site jobs
- Djcengineering handles high-site Starlink installs across South East Queensland
- Sources
Which Starlink high-site mount type suits your situation?
The mount type you choose shapes everything downstream: how much concrete you pour, whether you drill through your roof, and how the dish survives its first serious storm. Here's how each option maps to real-world scenarios.
Pole mount
A steel pole set in a concrete footing is the workhorse of rural and remote Starlink installs. You control the height, the location, and the orientation. It works on flat ground, on a hill, or at the edge of a cleared paddock. The tradeoff is the upfront labor: digging, mixing concrete, and waiting for the footing to cure before you mount the dish. In high-wind zones, a pole also needs to be sized correctly for the load, and taller poles may need guy wires for lateral stability.
Tower mount
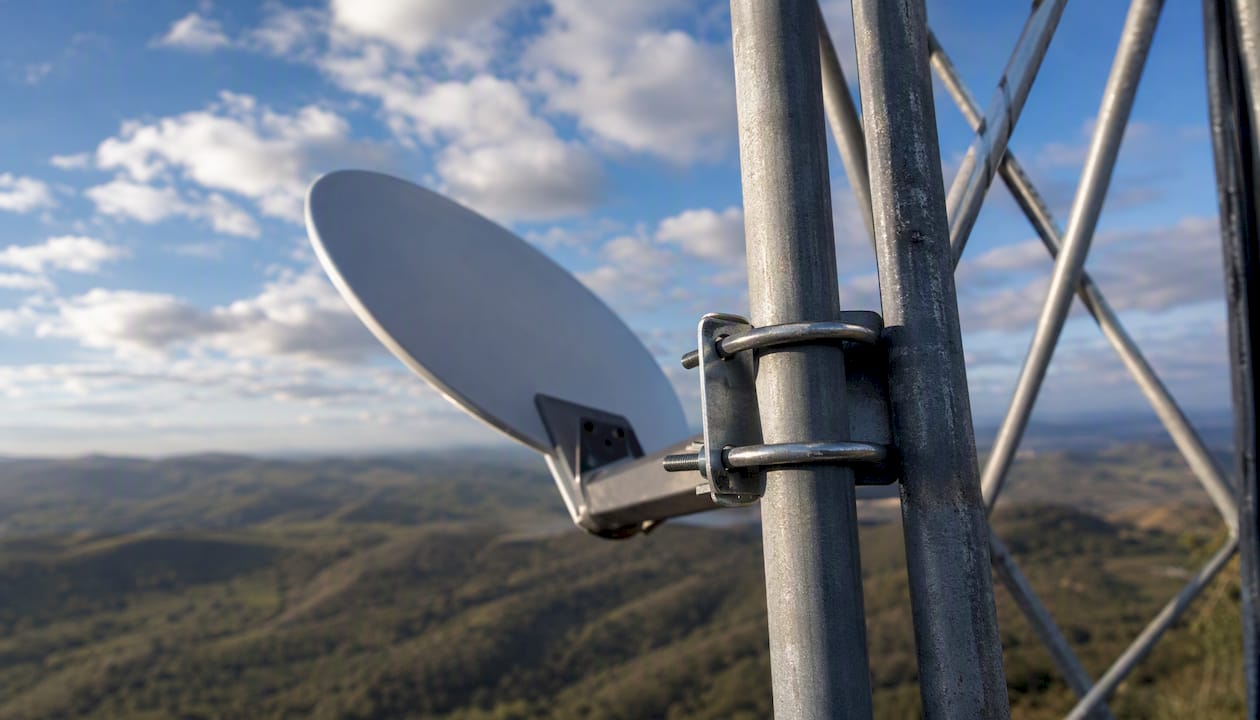
If you already have a communications tower, water tank stand, or steel mast on your property, a tower clamp mount is the fastest and cleanest solution. The clamp bolts to an existing tower leg and positions the dish on a short horizontal arm so the antenna clears the structural steel. No concrete, no ballast. The one constraint is sky clearance: the dish needs an unobstructed wide cone of sky, so you need to pick the tower face with the least obstruction and keep the dish away from other antenna clusters.
Pivot mount (roof mount for Starlink)
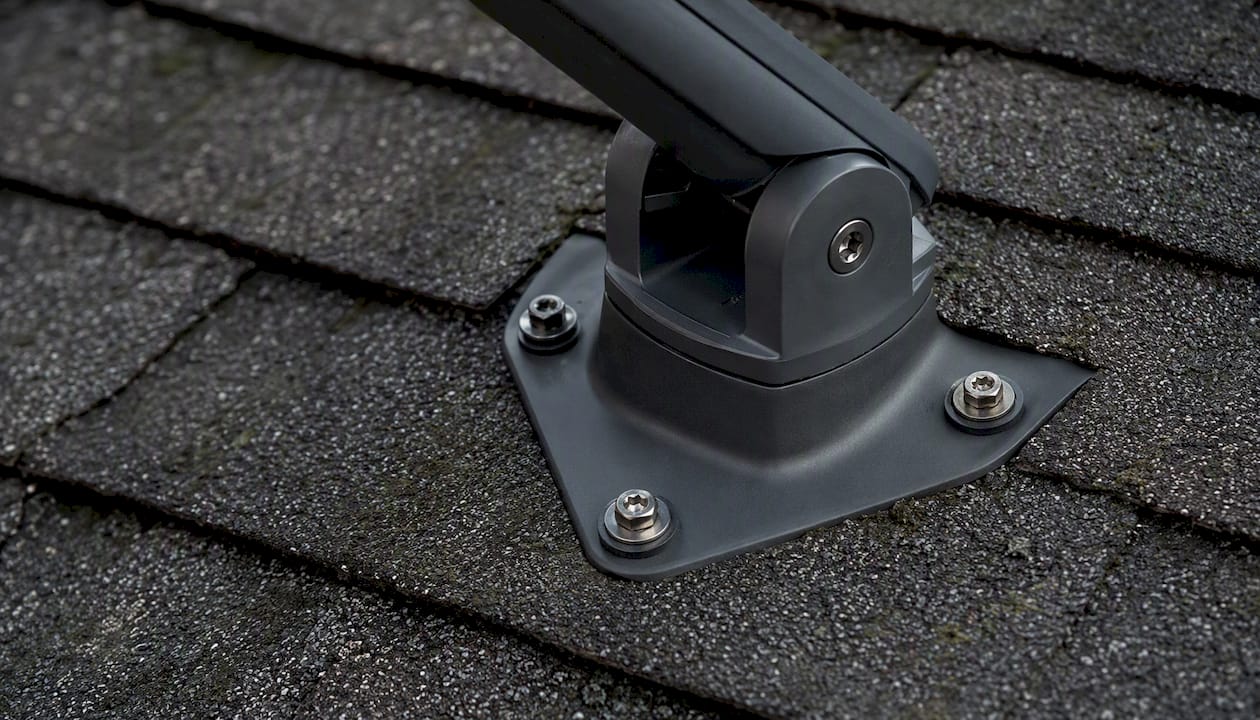
The official Starlink Pivot Mount is designed for sloped roofs and is the most common roof mount for Starlink on residential homes. It attaches directly to the roof decking with lag bolts through a flashing plate, giving a solid, low-profile connection. The pivot mechanism lets you angle the dish to compensate for roof pitch. The risk is the roof penetration itself: if the flashing isn't sealed properly, you have a water entry point. On high-site roofs with regular wind, this mount performs well when installed correctly.
Ridgeline ballast mount
The Starlink Ridgeline Mount sits on the peak of a gable roof and is held in place by ballast weight rather than fasteners. No drilling, no roof penetrations. That's genuinely useful for rental properties or owners who don't want to touch the roof membrane. The official accessories guide notes it's not recommended for clay tile roofs, and it's less suited to very steep slopes or high-wind sites where ballast alone may not hold. Think of it as a low-commitment option for moderate-exposure sites.
Wall mount
The official Starlink Wall Mount works for installations where the dish can be positioned on a gable end or exterior wall high enough to clear obstructions. The official spec limits overhang to a maximum of 4 inches, so it's not a substitute for a pole when you need serious elevation. It's a practical choice for a two-story home where the upper wall puts the dish above the roofline.
RV and vehicle mounts
For caravans, camper trailers, and work vehicles, purpose-built clamp mounts attach to roof racks, ladder racks, or roof rails without drilling. These are temporary or semi-permanent by design. They're not rated for highway speeds with the dish deployed, so the workflow is: drive to site, deploy dish, connect. Some aftermarket options allow low-speed travel with the dish up, but always verify the wind rating before doing so.
| Mount type | Best for | Roof penetration | Wind suitability | Portability |
|---|---|---|---|---|
| Pole mount | Rural, remote, open sites | None | High (with correct pole sizing) | No |
| Tower clamp | Existing tower or mast | None | High | No |
| Pivot / flashing | Sloped residential roofs | Yes | High (when properly flashed) | No |
| Ridgeline ballast | No-drill gable roofs | None | Moderate | Limited |
| Wall mount | Gable ends, upper walls | Yes | Moderate | No |
| RV / vehicle clamp | Caravans, mobile installs | None | Low (stationary use) | Yes |
Installation requirements, wind ratings, and weatherproofing
Getting the mount up is the easy part. Getting it to stay up through a Queensland storm season is where most DIY installs fall short.
Pole footing: the non-negotiables
The Starlink pole mount guide specifies a concrete footing of recommended minimum depth and width. That's the minimum for a standard residential install in average soil. Rocky or sandy ground may need deeper footings or a different anchor strategy entirely. Pour the concrete around the pole, not into it, and drill a drain hole approximately positioned above the ground line before the concrete sets. That weep hole stops water pooling inside the pole and corroding it from the inside out.
Keep the pole vertical within 5 degrees while the concrete cures. Use a spirit level on two perpendicular faces and brace the pole if needed. A pole that sets even slightly off-vertical creates alignment problems for motorized dishes that can't be corrected later without breaking up the footing.
Wind considerations
Wind loading on a Starlink dish at height is not trivial. The dish acts as a sail, and the force on the mount increases with the square of wind speed. For exposed coastal or elevated sites, look for mounts and poles rated to the wind speeds your site actually sees. Guy wires on taller poles (anything above 3 m freestanding) add significant lateral stability and are worth the extra hardware cost. Ask any supplier for the mount's wind speed rating before purchasing, not after.
For roof mounts, the lag bolt pattern and flashing spec matter as much as the bracket itself. Undersized lag bolts into rafter timber that's been compromised by age or moisture is a common failure point. Outdoor installation best practices for any rooftop electronics apply here: verify the substrate, use stainless fasteners, and seal every penetration.
Corrosion and materials
In coastal Queensland, standard zinc-plated hardware has a short service life. Specify hot-dip galvanized poles and brackets, or 316-grade stainless steel fasteners at minimum. Aluminum mounts are lighter and naturally corrosion-resistant but may not carry the load rating of steel at height. Seal every roof penetration with a compatible flashing compound and check it annually. The cable entry point into the pole should also be sealed to prevent moisture tracking down the cable into the pole interior.
Safety and compliance
Working at height on a residential roof requires fall protection. In Queensland, any work above 2 m on a residential structure triggers safe work obligations. If you're not equipped with a harness, anchor points, and the training to use them, this is where you stop and call a professional. Some local councils also require permits for structures above a certain height or for any penetration of a heritage-listed roof. Check before you dig or drill.
Pro Tip: Route the Starlink cable inside the pole and out through the top before you pour the concrete. Trying to thread cable through a set pole is a frustrating exercise that usually ends with a surface-run cable and a zip-tie job.
Starlink model compatibility and adapter sizing
Not every mount works with every Starlink model, and getting this wrong means returning hardware or improvising adapters on the day of install.
The official Starlink accessories guide specifies that the pipe adapter is compatible with poles between 31 mm and 63.5 mm outer diameter (roughly 1.25 to 2.5 inches). If your pole falls outside that range, you need a third-party adapter or a different pole. Measure the outer diameter of your pole before ordering, not the inner diameter.
Key compatibility points to check before purchasing:
- Wall mount overhang: the official wall mount supports a maximum overhang from the mounting surface
- Vertical tolerance: mount the dish within 5 degrees of vertical; motorized models have tighter tolerances and will throw a "Motors Stuck" alert in the Starlink app if the dish can't reach its required sweep angles
- Tilt on horizontal surfaces: the Starlink Help Center notes an 8° tilt is built into the dish design for horizontal surface installs to encourage water shedding
- Tower clamp sizing: measure the tower leg outer diameter before ordering a tower clamp; clamp sizes are not universal
- Third-party mounts: J-mounts and aftermarket flashing mounts are widely used and work well when paired with the Starlink pipe adapter, but verify the adapter diameter matches your pole before ordering
The ridgeline mount is not compatible with clay tile roofs per the official accessories guide. If you have a tile roof, a pole mount or a wall mount on the gable end is the safer path.
Tools, materials, and realistic costs
What you need for a DIY pole install
- Steel pole (hot-dip galvanized, sized to your wind load and height requirement)
- Concrete mix (rapid-set works well; allow full cure time before loading the pole)
- Stainless steel or galvanized fasteners throughout
- Spirit level, post-hole digger or auger, mixing tub
- Starlink pipe adapter (if using a third-party pole)
- Self-amalgamating tape and UV-resistant conduit for cable runs
- Roof flashing compound and stainless lag bolts (for roof mounts)
- Torque wrench for final fastener tightening
Hardware cost ranges
Mount hardware costs vary considerably by type and wind rating:
- Official Starlink mounts (wall, pivot, ridgeline, pipe adapter): typically AU$50–AU$150 per item through Starlink's own accessory store or local resellers
- Third-party J-mounts and flashing mounts: AU$40–AU$120 depending on material and wind rating; lower entry cost but verify compatibility with the pipe adapter
- Tower clamp mounts: AU$80–AU$200 for quality clamp hardware; price rises with clamp diameter and arm length
- Heavy-duty wind-rated pole and footing hardware: AU$150–AU$400+ for the pole, concrete, and associated hardware for a freestanding install in an exposed location
What drives costs up
- Larger pole diameters and longer poles for high-wind or tall-clearance installs
- Hot-dip galvanizing versus standard zinc plating (worth every dollar in coastal or exposed sites)
- Guy wire anchors and tensioners for tall freestanding poles
- Roof flashing and sealant materials for penetrating mounts
- Additional cable runs if the dish is more than 30 m from the router location
Professional installation costs
Labor for a professional Starlink high-site mount install in South East Queensland typically ranges from AU$300 to AU$800+ depending on site complexity, access difficulty, and whether the job includes cable routing inside walls or a structured cabling run. Remote properties add travel costs. Jobs requiring traffic management (working near a road), elevated access equipment, or significant roof work sit at the higher end. The professional installation guide covers what a scoped install typically includes.
How to decide: DIY vs. hiring a professional installer
Decision factors
The honest answer is that most pole mounts on flat, accessible ground are within reach of a competent DIYer with a weekend and the right tools. Most roof mounts on two-story homes in exposed locations are not.
Ask yourself:
- Can you safely access the mount location without a ladder above 2 m?
- Do you have a spirit level, a torque wrench, and experience mixing and pouring concrete?
- Is the roof penetration on a simple metal or tile roof with accessible rafters?
- Are local wind speeds at your site within the rating of the hardware you're buying?
- Does your Starlink warranty require professional installation for your model?
If you answered no to any of those, a professional quote is worth the call.
Questions to ask any installer
- Do you conduct a site survey before quoting, or is the quote based on a phone call?
- Are you licensed and insured for working at height on residential structures?
- What materials spec are you using: hot-dip galvanized, stainless, or zinc-plated?
- What's the warranty on workmanship, and does it cover the mount hardware?
- Will you test the connection and provide a speed test result at handover?
- What's the timeline from quote to install, and do you use subcontractors?
Red flags on quotes
- No site survey offered before a fixed price is given
- No mention of insurance or license details when asked
- Vague materials spec ("standard hardware" with no grade specified)
- No post-install verification or testing included
- Subcontractors used without disclosure
Short DIY capability checklist
- Comfortable working at the required height with appropriate fall protection
- Tools available: level, auger or post-hole digger, concrete mixer or tub, torque wrench
- Able to identify roof rafter locations for lag bolt placement
- Familiar with Starlink app obstruction check and alignment verification
- Confident sealing roof penetrations to a weatherproof standard
If two or more of those are a no, the professional route saves money in the long run.
What a professional high-site Starlink install actually looks like
A well-run professional install follows a clear sequence, and knowing that sequence helps you evaluate any quote you receive.
Step 1: Remote pre-check. The installer reviews satellite imagery, property layout, and any photos you provide to identify likely mount locations and flag access issues before arriving on site.
Step 2: On-site obstruction scan. Using the Starlink app's obstruction tool from the proposed mount location, the installer confirms the sky view meets the required clearance. If it doesn't, they identify an alternative location before any hardware goes up.
Step 3: Structural check. For roof mounts, the installer checks rafter spacing, roof condition, and the substrate at the proposed penetration point. For pole mounts, they assess soil type and drainage.
Step 4: Mount selection and installation. Hardware is selected to match the site conditions: pole diameter, footing depth, bracket wind rating, and fastener spec. The mount goes in to spec, with the pole set vertical within tolerance and the footing poured correctly.
Step 5: Dish alignment and verification. Once the mount is set, the dish is aligned and the Starlink app is used to confirm signal quality and check for obstruction alerts. A "Motors Stuck" alert at this stage means the mount is out of vertical tolerance and needs correction before handover.
Step 6: Cable routing and commissioning. Cable is routed inside the pole where possible, with a sealed entry point at the base. Roof penetrations are flashed and sealed. The networking and cabling run from dish to router is completed, tested, and documented.
Step 7: Handover. The installer provides a site report, confirms the connection with a speed test, and walks you through the setup. You know exactly what was installed, where the cable runs, and what the warranty covers.
A professional install isn't just about getting the dish up. It's about knowing the mount will still be there and still be aligned after the first serious storm. The footing depth, the fastener spec, and the cable routing are the parts you can't see from the ground — and they're exactly the parts that matter most.
Pro Tip: Ask your installer to photograph the footing before the concrete is poured and the roof penetration before the flashing is sealed. Those photos are your evidence if a warranty claim ever comes up.
What pros fix most often on high-site jobs
The most common call-back on high-site Starlink installs isn't a failed dish. It's a mount that was installed without enough thought given to what happens six months later.
Shallow pole footings are the most frequent structural issue. A pole set 300 mm into the ground with a small concrete collar looks fine on install day. After a wet season with saturated soil, it rocks. Correcting it means breaking up the footing and starting over, which costs more than doing it right the first time.
Corrosion is the second most common problem, and it's almost always a fastener issue. Zinc-plated bolts on a coastal or high-humidity site start showing rust within a year. By year three, they're seized or structurally compromised. Specifying 316 stainless from the start adds a small upfront cost and eliminates the problem entirely.
Poor cable routing creates a different kind of headache. A cable surface-run down the outside of a pole, held with cable ties, degrades in UV and becomes brittle. When it fails, you're replacing the cable and re-routing it through a set pole, which is significantly harder than routing it through the pole before the concrete goes in.
Vertical alignment errors are the sneakiest problem because they don't always show up immediately. A motorized dish that's mounted 7 or 8 degrees off vertical may still connect, but it will throw intermittent "Motors Stuck" alerts and may not track satellites as efficiently. The fix requires loosening the mount and re-shimming, which on a roof or tall pole is not a quick job.
For long-term reliability on coastal sites, a sacrificial zinc anode on the pole base is worth considering. It's a technique borrowed from marine applications and adds years to the life of a steel pole in salt-air environments.
Djcengineering handles high-site Starlink installs across South East Queensland
Djcengineering's Starlink installation service is built around one principle: the job is scoped properly before any hardware is ordered. Every install starts with a site survey, not a phone estimate. That means the mount type, pole spec, cable routing, and footing depth are confirmed on-site before you're committed to a quote.
Djcengineering uses accredited installers on every job, with no subcontractors. That matters for warranty and insurance: if something needs to be fixed, the same team that installed it comes back. Every install includes a tested, verified connection at handover, not just a dish on a pole. For properties that need more than just Starlink, Djcengineering also handles structured cabling and networking and WiFi design and commissioning as part of a single scoped job.
To get a quote for a high-site Starlink install, contact Djcengineering directly. Expect a response within one business day and a site survey scheduled from there.
Sources
The sources below are the primary references for the specifications and installation guidance covered in this article.
Recommended
- Professional Starlink Installation: A Step-by-Step Engineering Guide for SE QLD | DJC Engineering
- Starlink: High-Speed Internet Guide for Rural QLD | DJC Engineering
- Starlink Brisbane: Overcoming Urban Connectivity Gaps with Professional Engineering | DJC Engineering
- Starlink, NBN, Optus & Telstra Installer SEQ | DJC