

The fastest fix for most Wi-Fi dead spots is moving your router to a central, elevated, open spot and running a quick speed test in the affected room. If that doesn't clear it up, download a Wi-Fi analyzer app, check the signal strength where the connection drops and pick a fix that matches what you find instead of guessing. Most dead spots trace back to distance, walls, or interference, and each has a specific solution.
TL;DR:
- Moving your router to a central, elevated, and open location can resolve most dead spots without additional hardware.
- A Wi-Fi analyzer app can help identify weak signal areas and interference sources that manual guessing might overlook.
- Signal strength below -75 dBm generally indicates a dead zone, especially if combined with low signal-to-noise ratio readings.
- Upgrading to wired access points or using Ethernet cables offers the most reliable fix for persistent dead zones in larger or complex buildings.
- When DIY fixes fail, professional site surveys provide accurate mapping, tailored solutions, and better long-term coverage, especially in challenging structures.
Table of Contents
- What Causes Wi-Fi Dead Spots?
- How Do You Find and Map Wi-Fi Dead Spots?
- What Free Fixes Should You Try Before Buying Hardware?
- Which Hardware Upgrade Actually Fixes Persistent Dead Zones?
- When Should You Call a Professional Wi-Fi Installer?
- How Do You Confirm the Fix Actually Worked?
- What I've Learned Fixing Dead Zones the Hard Way
- Get a Wi-Fi System That Doesn't Have Dead Zones in the First Place
- Sources
What Causes Wi-Fi Dead Spots?
Distance kills Wi-Fi faster than most people expect, and frequency makes it worse. A 2.4 GHz signal travels farther and pushes through walls better than 5 GHz or 6 GHz, but it's slower and more crowded. Move to a back bedroom or garage on the 5 GHz band, and you can lose the connection entirely even though your phone shows "connected" the whole time.
Building materials matter more than layout. Concrete and brick absorb signal. Metal studs, mirrored glass, and even a large fish tank reflect or scatter it. A router that covers an entire timber-frame house beautifully can barely reach the next room in a double-brick build.
Interference adds a second layer of trouble. Neighboring networks on the same channel, microwaves, baby monitors, and some cordless phones all compete for the same 2.4 GHz airspace. Your device itself plays a role too. Smaller antennas in phones and laptops, plus battery-saving Wi-Fi modes, mean a device can struggle in a spot your router technically still covers.
There's a hard number worth knowing here: signal at or below about −75 dBm typically produces dropouts and severe performance degradation. Anything weaker than that, and you're not dealing with "slow Wi-Fi." You're in a dead zone.
How Do You Find and Map Wi-Fi Dead Spots?
Guessing where coverage fails wastes more time than measuring it properly. A basic walk-test takes fifteen minutes and tells you almost everything you need to know before spending a dollar on hardware.
Start by opening a speed test app on your phone and physically walking through the property, logging results as you go.
- Test in every room you actually use, plus stairwells, garages, and outdoor living areas.
- Record download speed, ping, and the room name for each test.
- Note which device you used, since laptops and phones report signal differently.
- Repeat at a different time of day, since neighboring networks and household devices shift interference throughout the day.
If the walk-test shows a clear problem area, the next step is a proper Wi-Fi analyzer or site-survey app, which turns raw numbers into a heatmap you can actually read. Look at three views: signal level (in dBm), signal-to-noise ratio (SNR), and interference. A strong signal sitting in a noisy SNR reading still performs badly, which is why checking signal strength alone is often misleading.
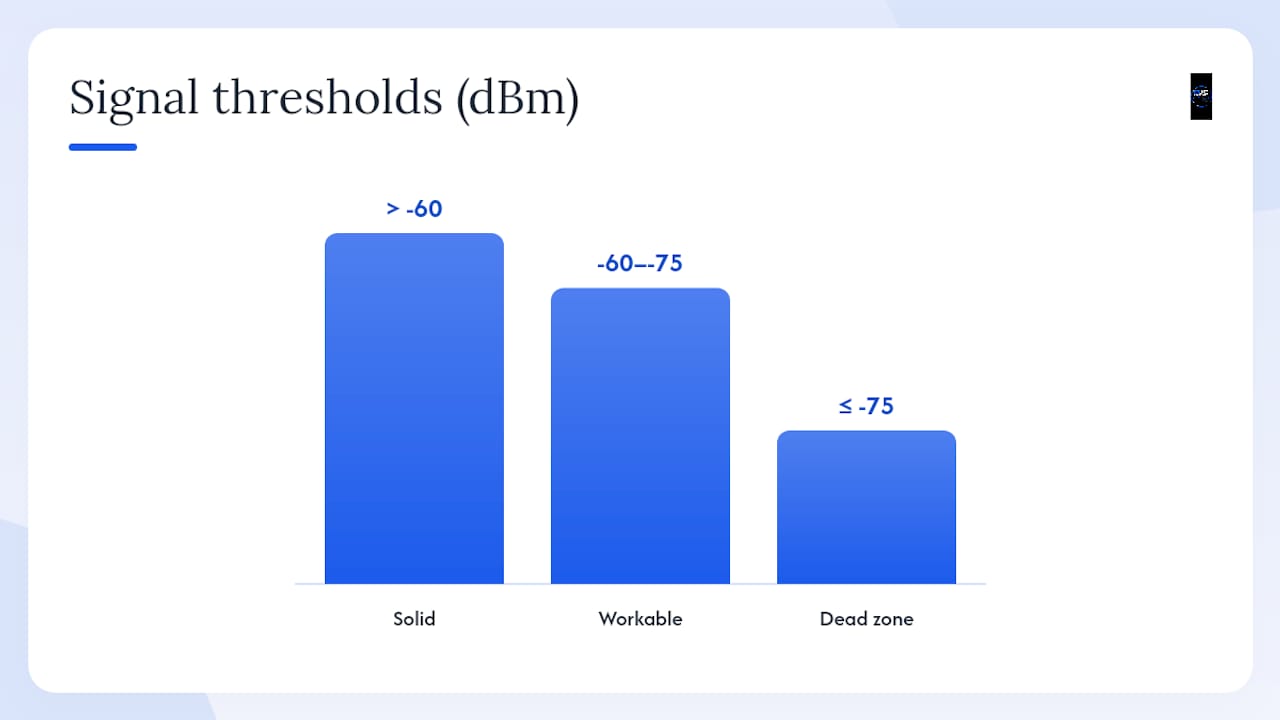
As a rough guide, anything better than −60 dBm with high SNR is solid, −60 to −75 dBm is workable but weak, and below −75 dBm is the dead zone threshold. A DIY heatmap works fine for a single-story home. Multi-story buildings, concrete construction, or commercial spaces usually justify a proper Wi-Fi site survey instead.
What Free Fixes Should You Try Before Buying Hardware?
Before spending money on new equipment, run through these steps in order. Most dead spots resolve somewhere in this list.
- Move and raise the router. Get it out of the cabinet, off the floor, and away from exterior walls. Placement rules like central position and open air around the unit solve a surprising share of complaints on their own.
- Switch bands or channels. Use 2.4 GHz for range through walls and 5 or 6 GHz for speed in open rooms. Change the channel manually if your analyzer shows congestion from neighboring networks.
- Restart everything. Router, modem, and mesh nodes all benefit from a reboot, and outdated firmware causes more coverage problems than people assume.
- Check ISP equipment placement. Modems are often stuck wherever the cable enters the house, which is rarely the best Wi-Fi location. A separate router placed centrally usually beats leaving everything on the ISP box.
- Isolate suspected interference sources temporarily. Unplug the microwave or baby monitor during a test to see if the dead spot improves.
- Repurpose old hardware as a wired access point. If you have a spare router and can run an Ethernet cable to the problem area, this often outperforms a wireless-only fix entirely.
Pro Tip: Don't judge a channel change by one test. Run the walk-test again at a busy time of day, like evening, when every neighbor's Netflix and gaming traffic is competing for the same 2.4 GHz channels.
Which Hardware Upgrade Actually Fixes Persistent Dead Zones?
When placement and channel changes don't clear the dead spot, the right hardware depends on the building, not personal preference.
- Extenders and repeaters are the cheapest option and help in small gaps, but they rebroadcast on the same radio they receive on, which typically halves usable bandwidth in the extended zone.
- Mesh systems spread coverage across multiple nodes and work well in larger or multi-story homes, but performance depends entirely on backhaul quality between nodes. A mesh system with weak node placement can still leave dead spots.
- Wired access points connected by Ethernet are the most reliable fix available, since each AP gets a full, dedicated connection instead of sharing wireless bandwidth with the main router.
- Powerline and MoCA adapters turn existing electrical wiring or coax cable into a data backhaul, which works well in older homes where running new cable is impractical, though performance varies with wiring quality.
- Point-to-point wireless links solve a different problem entirely: getting a signal to a separate structure like a shed, garage, or granny flat where running cable underground isn't feasible.
One case worth knowing: a single Ethernet cable and a repurposed old router fixed an outdoor dead zone more reliably than a mesh system would have, simply because wired backhaul doesn't compete for airtime. If you can run a cable, it usually beats adding another wireless hop.
When Should You Call a Professional Wi-Fi Installer?
Some dead spots resist every DIY fix, and that's a signal, not a failure on your part. Call in a professional site survey when any of these apply.
- The dead spot persists after placement changes, channel changes, and at least one hardware attempt.
- The building has concrete, brick, or steel-frame construction where signal loss is structural, not incidental.
- You need coverage across multiple buildings, such as a house plus a workshop or shed.
- A business depends on uptime, where an unreliable connection costs more than the fix would.
A proper survey delivers more than a technician walking around with a phone. Expect heatmaps, a recommended access point layout, structured cabling where needed, and a commissioning process that confirms everything works before the job is signed off. When you get a quote, ask for before-and-after test results and a warranty on the install, not just a parts list.
Djcengineering runs every job this way, with a 98% first-visit fix rate built on site-surveyed installs rather than a router dropped in the nearest power outlet. That figure matters because callbacks are expensive for everyone, and getting the design right the first time is cheaper than a second visit to fix a rushed one. Their installs also cover Starlink and NBN integration, which matters for rural properties where the internet connection itself, not just the Wi-Fi, is the bottleneck.
How Do You Confirm the Fix Actually Worked?
Don't assume a fix worked because the bars on your phone look better. Verify it the same way you diagnosed the problem.
- Repeat the exact walk-test from your original diagnosis, in the same rooms, and log the new numbers next to the old ones.
- Check dBm and SNR readings, then run a speed test and try a ping-sensitive app like a video call to catch latency issues raw speed tests miss.
- Test on at least two different devices, since a phone and a laptop can report very different results in the same spot.
- If you're running mesh, walk slowly between rooms to confirm nodes hand off the connection smoothly instead of holding onto a weak signal too long.
- Save your before-and-after screenshots. They're useful if a problem resurfaces later, and any installer will want them for warranty claims.
What I've Learned Fixing Dead Zones the Hard Way
The order matters more than the tools. Move the router first, measure what actually changed, verify with real numbers, and only escalate to a professional when the data says the problem is structural, not solvable with placement. Skipping straight to "buy a mesh system" wastes money more often than it saves time, because plenty of dead spots turn out to be a router stuffed in a cabinet.
That discipline is exactly why a measured, site-surveyed approach beats trial-and-error hardware swaps, and why a 98% first-visit fix rate is achievable at all. Diagnosing correctly the first time is the whole game.
— Dylan
Get a Wi-Fi System That Doesn't Have Dead Zones in the First Place
If you've worked through the walk-tests, swapped channels, and tried a mesh kit from the hardware store and the dead spot is still there, the problem is usually structural, not something another app or extender will solve. Djcengineering approaches this differently: a site visit maps your actual signal levels and interference before any equipment gets recommended, so you're not paying to guess twice.

The process runs in four steps: a site visit to measure real conditions, a fixed quote based on what your building actually needs, professional installation using structured cabling or engineered wireless access points where cable isn't practical, and a commissioning check that confirms coverage before the job is called done. That includes Starlink and NBN connectivity work for rural properties where the internet feed itself needs sorting alongside the Wi-Fi. Every install comes with documentation and warranty support, not just a router left on your kitchen counter. If dead zones have outlasted your patience, start with a professional networking assessment and get a layout built around your actual building instead of a guess.
Sources
For further reading and measurement, NetSpot's heatmap guide covers analyzer basics well, and How-To Geek's placement guide is a solid free-fix reference before you spend on hardware.
- How to fix a WiFi dead zone in your home — CompareBroadband
- How to Find and Fix WiFi Dead Zones — NetSpot
- These are the 3 router placement rules that eliminate dead zones — How-To Geek
- WiFi dead zones: find and eliminate — SpeedTests